When the subject of a pumpkin purchased as a seasonal decoration by
RunsWithScissors4 arose in conversation amongst my fellow
Sneak Attackers on an
Etsy message board, I admit I really wasn't paying attention. It wasn't until some time later, as people were discussing a challenge to create items inspired by the afore-mentioned pumpkin, that my curiosity was piqued. The vegetable in question was a peanut pumpkin, a type of squash that starts out looking like a normal orange pumpkin, but is gradually overgrown by little beige squiggly ridges. Runs posted a picture on
her blog, and people began using the picture as either an inspiration or component in creations.

While others expressed gleeful disgust at the pumpkin, and joyously called it ugly...I thought it was pretty. To me, it looked soft, elegant, and vaguely lacey. Although I had no intention to join in on the challenge, I immediately had a thought of what I would like to do. Finally, I gave in, went to borrow a skein of off-white yarn from my mother, and started hunting for a crochet hook.


I found a size K hook in a bag of polymer clay in my craft closet (well, it's MOSTLY organized in there!) and got to work. I started working in a circle, of course, and worked in single crochet, adding stitches whenever it seemed ike the thing to do. After several rounds, I started skipping stitches to start pulling the floppy disk into a bowl. I then crocheted a couple of rounds without adding or dropping stitches for the center.

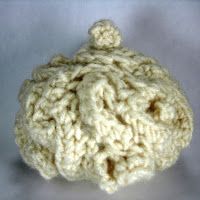
Working up toward the top, I again dropped stitches as I went to close the top. As I neared the stem area, I stopped and stuffed as much fiberfill in as I could. I then crocheting and continued dropping stitches to close until I was down to 8 stitches. At this point, I formed the stem by crocheting a few 8 stitch rounds, then used a couple of stitches to close the tube. Next, to put the "peanuts" on my little pumpkin. With no particular plan in mind, I started crocheting swirling lines onto the surface of the pumpkin. With the exception of the lines closest to the stem, I crocheted a second row on most of the lines. I continued until the base stitches were almost entirely covered.


When I was done, I compared my little mini-pumpkin to the original:

I like how it turned out, and I'm glad to have worked the idea out! It doesn't really fit the style of my
shop, so I don't know whether I'll bother listing it. But I'm not quite sure what else to do with it...it sure is cute though, isn't it?


 I found a size K hook in a bag of polymer clay in my craft closet (well, it's MOSTLY organized in there!) and got to work. I started working in a circle, of course, and worked in single crochet, adding stitches whenever it seemed ike the thing to do. After several rounds, I started skipping stitches to start pulling the floppy disk into a bowl. I then crocheted a couple of rounds without adding or dropping stitches for the center.
 Working up toward the top, I again dropped stitches as I went to close the top. As I neared the stem area, I stopped and stuffed as much fiberfill in as I could. I then crocheting and continued dropping stitches to close until I was down to 8 stitches. At this point, I formed the stem by crocheting a few 8 stitch rounds, then used a couple of stitches to close the tube. Next, to put the "peanuts" on my little pumpkin. With no particular plan in mind, I started crocheting swirling lines onto the surface of the pumpkin. With the exception of the lines closest to the stem, I crocheted a second row on most of the lines. I continued until the base stitches were almost entirely covered.

 When I was done, I compared my little mini-pumpkin to the original:
 I like how it turned out, and I'm glad to have worked the idea out! It doesn't really fit the style of my shop, so I don't know whether I'll bother listing it. But I'm not quite sure what else to do with it...it sure is cute though, isn't it?


5 comments:
That is a fabulous peanut pumpkin!
Gah- I like yours sooooo much better than the real thing!!
Well, mine's cuddlier, anyway!
Beqi - I love it! You did a great job on it. And it looks very close to the real thing!
I'll bet it is much softer than the real thing! lol!
Adorable!!! I think you should sell it in your shop, it adds variety!
Post a Comment