When I was in high school—10th grade, I think—I made myself a ladybug costume. I wore black jeans, a black turtleneck, and black shoes and socks as the base outfit. I made a pair of extra legs (since lady bugs have six, so my arms + my legs + my extra legs = 6 appendages) which had loops at the top for sliding onto a belt, and yarn connecting them to my wrists, so when my arms moved, the extra arms moved, too. A red split circle cape with black dots completed the outfit. Over the years, I have worn the costume many times, and other than the legs and cape, and the fact that the base outfit is always all black, the rest tends to change every year.
This year I decided I needed some new antennae. At some point in the past I had made a pair using black pipe cleaners and pompons, but they never worked particularly well and have long since been discarded. After brainstorming a bit, I decided to use some scrap wood to make beads for the ends of the antennae, and wire for the stems. Since my hair is unusually long at the moment and I can, with some trickery and cajoling, anchor a hair comb in my hair, I decided to take advantage of that fact and use a cheap plastic comb as the anchor.
First, the beads. I used an extra piece of East Indian rosewood, because it is a dark wood (in retrospect, a paler wood probably would have made the antennae more visible). I decided to drill the center hole first, so I could drill both beads at once and be sure the holes were centered.
Next, I traded the tailstock drill chuck for a live center to support the length of the wood, and roughed it to round. I carefully cut the shape of the two beads (and got them pretty close to the same size and shape!), finished them with friction polish, but did not cut them off…I hadn’t left enough room between the two to use a parting chisel to cut them off.
So I used a hacksaw. I sawed with my right hand while spinning the part with my left hand. (I’d show you a picture of the finished beads, but it did not turn out well). I sanded the ends slightly, but the saw marks are still pretty visible. However, I correctly assumed that no one would be looking at them that closely.
Next I started assembling the whole piece. I cut a length of craft wire and centered it in the comb. Rather than placing the wire in the center, I gave it a wider stance for stability and wrapped it around.
I twisted the wires around each other , then started creating loops for a whimsical look. At the ends, I added the beads, then simply looped the wire around itself to hold them securely. And that’s all it took!
Finally, after getting the rest of the costume on I checked the look of the final product by jamming the comb down into hairdo I had created for the purpose.
I was going to a roller skating party, so I had to take the antennae off again while I drove over. As I was getting out of the car, I put my long black gloves on, re-inserted the antennae using the reflection in the car window as a mirror, and attached the loops controlling my extra arms (yeah, I don’t drive with those attached). And I am proud to announce that, despite my inability to skate, I successfully skated around the rink a total of 8 times (non-consecutively) and overall had an enjoyable time.
Friday, October 30, 2009
Thursday, October 15, 2009
Yes, peanut pumpkins are real.
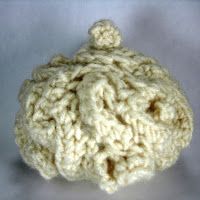
When the subject of a pumpkin purchased as a seasonal decoration by RunsWithScissors4 arose in conversation amongst my fellow Sneak Attackers on an Etsy message board, I admit I really wasn't paying attention. It wasn't until some time later, as people were discussing a challenge to create items inspired by the afore-mentioned pumpkin, that my curiosity was piqued. The vegetable in question was a peanut pumpkin, a type of squash that starts out looking like a normal orange pumpkin, but is gradually overgrown by little beige squiggly ridges. Runs posted a picture on her blog, and people began using the picture as either an inspiration or component in creations.
While others expressed gleeful disgust at the pumpkin, and joyously called it ugly...I thought it was pretty. To me, it looked soft, elegant, and vaguely lacey. Although I had no intention to join in on the challenge, I immediately had a thought of what I would like to do. Finally, I gave in, went to borrow a skein of off-white yarn from my mother, and started hunting for a crochet hook.
I found a size K hook in a bag of polymer clay in my craft closet (well, it's MOSTLY organized in there!) and got to work. I started working in a circle, of course, and worked in single crochet, adding stitches whenever it seemed ike the thing to do. After several rounds, I started skipping stitches to start pulling the floppy disk into a bowl. I then crocheted a couple of rounds without adding or dropping stitches for the center.
Working up toward the top, I again dropped stitches as I went to close the top. As I neared the stem area, I stopped and stuffed as much fiberfill in as I could. I then crocheting and continued dropping stitches to close until I was down to 8 stitches. At this point, I formed the stem by crocheting a few 8 stitch rounds, then used a couple of stitches to close the tube. Next, to put the "peanuts" on my little pumpkin. With no particular plan in mind, I started crocheting swirling lines onto the surface of the pumpkin. With the exception of the lines closest to the stem, I crocheted a second row on most of the lines. I continued until the base stitches were almost entirely covered.
When I was done, I compared my little mini-pumpkin to the original:
I like how it turned out, and I'm glad to have worked the idea out! It doesn't really fit the style of my shop, so I don't know whether I'll bother listing it. But I'm not quite sure what else to do with it...it sure is cute though, isn't it?
Monday, October 5, 2009
What Do You Tink of That? Part III
(The third and final installment of projects made using vintage labels provided by TinkersShop)
The final label I needed to work with was the red and black Spanish one. Although I do not know Spanish, from those who know more than I do, I understand that this label was printed for use on aftershave originating in Barcelona. My attention was immediately drawn to the man’s face. I knew I wanted that to be the focal point of my project, but I wasn’t quite sure what to do with him.
I went through several ideas, from jewelry to making a puzzle of the entire label. But when it came right down to it, I knew I had to do something simple. You see, this past week I was involved in the final rehearsals for a staged concert of one of my favorite Gilbert and Sullivan operettas, Ruddigore (in which I was playing one of my dream roles, Mad Margaret). So with my regular responsibilities at school, I was running out of available time. (And actually, I believe I’m a little late with this final project, anyway.) So I went with a very simple but useful choice: a refrigerator magnet.
Some time ago I bought several rare-earth magnets to use in woodturning projects. I hadn’t gotten around to using them yet, so I went over to my parents’ house where I keep my woodturning equipment and retrieved the magnets. These nickel-plated magnets are very strong. Mine are the 3/8” size—any larger would be fairly difficult to remove from a refrigerator!
The first part of the process was very simple: I cut the picture out of the label, then cut a piece of 1/8” cherry slightly larger. I sanded the wood to clean and soften the edges and smooth the front and back.
Next, I decoupaged the image to the wood using Mod Podge. I used one of my smaller brushes and made decorative swirls in a thick layer of the finish.
Finally—or so I thought—I prepared to affix the magnet to the wood. I mixed a two-part epoxy recommended to me by the woodturning supply store. Because I had previously had trouble with this epoxy, I was very very careful to make sure the amounts of resin and hardener were. I applied the epoxy to the magnet with a toothpick, than carefully placed it on the back of the piece of cherry. The epoxy states that it takes 20 minutes to harden, and another hour to cure. So, since it was bedtime, I left it to cure. I actually left it for closer to 24 hours. But when I checked it again, the epoxy had not cured at all! Testing it by using a steel tool to pull at the magnet, the magnet easily separated from the wood. Now, I knew that if the epoxy had not cured at this point, it would not cure. So I set it aside for a while and went to rehearsal.
A day or two later, I finally decided what to do with it. I cleaned the remnants of uncured epoxy as well as I could, then pulled out my back-up adhesive: a quick-setting cyanoacrylate. Being again very careful with the application, I once again attempted to stick the magnet to the wood. Once again, I left it overnight.
This time when I used a steel tool to try to pull the magnet off the wood, the magnet stayed put. I tried a second test by sticking the magnet to my refrigerator, and was quite pleased to see that the adhesive was successfully holding the wood to the magnet, and that the magnet could be removed from the fridge!
The only minor problem remaining what that I wasn’t quite happy with the appearance of the back. The smudging of the epoxy, and perhaps also the cyanoacrylate, had darkened the wood around the rare-earth magnet. Although this would not be seen in use, I didn’t want it to be quite so obvious.
So, I grabbed my brush and Mod Podge once more and evenly coated the back of the wood. Although this does not hide the spot, it does present a more finished look, which satisfies me quite well!
Subscribe to:
Posts (Atom)