Friday, October 30, 2009

The Return of Lady Bug

When I was in high school—10th grade, I think—I made myself a ladybug costume. I wore black jeans, a black turtleneck, and black shoes and socks as the base outfit. I made a pair of extra legs (since lady bugs have six, so my arms + my legs + my extra legs = 6 appendages) which had loops at the top for sliding onto a belt, and yarn connecting them to my wrists, so when my arms moved, the extra arms moved, too. A red split circle cape with black dots completed the outfit. Over the years, I have worn the costume many times, and other than the legs and cape, and the fact that the base outfit is always all black, the rest tends to change every year.

This year I decided I needed some new antennae. At some point in the past I had made a pair using black pipe cleaners and pompons, but they never worked particularly well and have long since been discarded. After brainstorming a bit, I decided to use some scrap wood to make beads for the ends of the antennae, and wire for the stems. Since my hair is unusually long at the moment and I can, with some trickery and cajoling, anchor a hair comb in my hair, I decided to take advantage of that fact and use a cheap plastic comb as the anchor.

First, the beads. I used an extra piece of East Indian rosewood, because it is a dark wood (in retrospect, a paler wood probably would have made the antennae more visible). I decided to drill the center hole first, so I could drill both beads at once and be sure the holes were centered.
Next, I traded the tailstock drill chuck for a live center to support the length of the wood, and roughed it to round. I carefully cut the shape of the two beads (and got them pretty close to the same size and shape!), finished them with friction polish, but did not cut them off…I hadn’t left enough room between the two to use a parting chisel to cut them off.
So I used a hacksaw. I sawed with my right hand while spinning the part with my left hand. (I’d show you a picture of the finished beads, but it did not turn out well). I sanded the ends slightly, but the saw marks are still pretty visible. However, I correctly assumed that no one would be looking at them that closely.

Next I started assembling the whole piece. I cut a length of craft wire and centered it in the comb. Rather than placing the wire in the center, I gave it a wider stance for stability and wrapped it around.
I twisted the wires around each other , then started creating loops for a whimsical look. At the ends, I added the beads, then simply looped the wire around itself to hold them securely. And that’s all it took!
Finally, after getting the rest of the costume on I checked the look of the final product by jamming the comb down into hairdo I had created for the purpose.
I was going to a roller skating party, so I had to take the antennae off again while I drove over. As I was getting out of the car, I put my long black gloves on, re-inserted the antennae using the reflection in the car window as a mirror, and attached the loops controlling my extra arms (yeah, I don’t drive with those attached). And I am proud to announce that, despite my inability to skate, I successfully skated around the rink a total of 8 times (non-consecutively) and overall had an enjoyable time.

Thursday, October 15, 2009

Yes, peanut pumpkins are real.

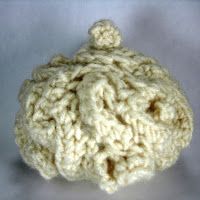
When the subject of a pumpkin purchased as a seasonal decoration by RunsWithScissors4 arose in conversation amongst my fellow Sneak Attackers on an Etsy message board, I admit I really wasn't paying attention. It wasn't until some time later, as people were discussing a challenge to create items inspired by the afore-mentioned pumpkin, that my curiosity was piqued. The vegetable in question was a peanut pumpkin, a type of squash that starts out looking like a normal orange pumpkin, but is gradually overgrown by little beige squiggly ridges. Runs posted a picture on her blog, and people began using the picture as either an inspiration or component in creations.
While others expressed gleeful disgust at the pumpkin, and joyously called it ugly...I thought it was pretty. To me, it looked soft, elegant, and vaguely lacey. Although I had no intention to join in on the challenge, I immediately had a thought of what I would like to do. Finally, I gave in, went to borrow a skein of off-white yarn from my mother, and started hunting for a crochet hook.

I found a size K hook in a bag of polymer clay in my craft closet (well, it's MOSTLY organized in there!) and got to work. I started working in a circle, of course, and worked in single crochet, adding stitches whenever it seemed ike the thing to do. After several rounds, I started skipping stitches to start pulling the floppy disk into a bowl. I then crocheted a couple of rounds without adding or dropping stitches for the center.
Working up toward the top, I again dropped stitches as I went to close the top. As I neared the stem area, I stopped and stuffed as much fiberfill in as I could. I then crocheting and continued dropping stitches to close until I was down to 8 stitches. At this point, I formed the stem by crocheting a few 8 stitch rounds, then used a couple of stitches to close the tube. Next, to put the "peanuts" on my little pumpkin. With no particular plan in mind, I started crocheting swirling lines onto the surface of the pumpkin. With the exception of the lines closest to the stem, I crocheted a second row on most of the lines. I continued until the base stitches were almost entirely covered.


When I was done, I compared my little mini-pumpkin to the original:
I like how it turned out, and I'm glad to have worked the idea out! It doesn't really fit the style of my shop, so I don't know whether I'll bother listing it. But I'm not quite sure what else to do with it...it sure is cute though, isn't it?

Monday, October 5, 2009

What Do You Tink of That? Part III

(The third and final installment of projects made using vintage labels provided by TinkersShop)
The final label I needed to work with was the red and black Spanish one. Although I do not know Spanish, from those who know more than I do, I understand that this label was printed for use on aftershave originating in Barcelona. My attention was immediately drawn to the man’s face. I knew I wanted that to be the focal point of my project, but I wasn’t quite sure what to do with him.

I went through several ideas, from jewelry to making a puzzle of the entire label. But when it came right down to it, I knew I had to do something simple. You see, this past week I was involved in the final rehearsals for a staged concert of one of my favorite Gilbert and Sullivan operettas, Ruddigore (in which I was playing one of my dream roles, Mad Margaret). So with my regular responsibilities at school, I was running out of available time. (And actually, I believe I’m a little late with this final project, anyway.) So I went with a very simple but useful choice: a refrigerator magnet.

Some time ago I bought several rare-earth magnets to use in woodturning projects. I hadn’t gotten around to using them yet, so I went over to my parents’ house where I keep my woodturning equipment and retrieved the magnets. These nickel-plated magnets are very strong. Mine are the 3/8” size—any larger would be fairly difficult to remove from a refrigerator!
The first part of the process was very simple: I cut the picture out of the label, then cut a piece of 1/8” cherry slightly larger. I sanded the wood to clean and soften the edges and smooth the front and back.

Next, I decoupaged the image to the wood using Mod Podge. I used one of my smaller brushes and made decorative swirls in a thick layer of the finish.
Finally—or so I thought—I prepared to affix the magnet to the wood. I mixed a two-part epoxy recommended to me by the woodturning supply store. Because I had previously had trouble with this epoxy, I was very very careful to make sure the amounts of resin and hardener were. I applied the epoxy to the magnet with a toothpick, than carefully placed it on the back of the piece of cherry. The epoxy states that it takes 20 minutes to harden, and another hour to cure. So, since it was bedtime, I left it to cure. I actually left it for closer to 24 hours. But when I checked it again, the epoxy had not cured at all! Testing it by using a steel tool to pull at the magnet, the magnet easily separated from the wood. Now, I knew that if the epoxy had not cured at this point, it would not cure. So I set it aside for a while and went to rehearsal.

A day or two later, I finally decided what to do with it. I cleaned the remnants of uncured epoxy as well as I could, then pulled out my back-up adhesive: a quick-setting cyanoacrylate. Being again very careful with the application, I once again attempted to stick the magnet to the wood. Once again, I left it overnight.
This time when I used a steel tool to try to pull the magnet off the wood, the magnet stayed put. I tried a second test by sticking the magnet to my refrigerator, and was quite pleased to see that the adhesive was successfully holding the wood to the magnet, and that the magnet could be removed from the fridge!

The only minor problem remaining what that I wasn’t quite happy with the appearance of the back. The smudging of the epoxy, and perhaps also the cyanoacrylate, had darkened the wood around the rare-earth magnet. Although this would not be seen in use, I didn’t want it to be quite so obvious.
So, I grabbed my brush and Mod Podge once more and evenly coated the back of the wood. Although this does not hide the spot, it does present a more finished look, which satisfies me quite well!


Saturday, September 26, 2009

What Do You Tink About That? Part II

(continuing the making of projects based on a challenge set by TinkersShop)For this second Tink Project, I decided to use the owl label. After toying with several different uses for it, I settled on making a book. While I was getting my undergrad degree, I took a bookbinding class twice, just because I enjoy it. However, it has been several years since I’ve pulled out my bookbinding supplies. I’ve been carefully toting my binder’s board and papers around with me from apartment to apartment in the meantime, though.

I knew I wanted to do a paper-covered book, the more easily to incorporate the owl label. While I was mulling over the various papers in my collection, trying to decide which would be best, I got what I think is a brilliant idea: to cover the boards with a print from an old catalog, with fiddly little lists of prices and old-fashioned drawings. As I don’t have any antique catalogs around (and probably wouldn’t use them to cover books even if I did), I turned to another hobby of mine, the Distributed Proofreaders. This site coordinates volunteers from around the world to scan, proof, and format books in the public domain, then submits the finished files to Project Gutenberg and other sites for free download to the masses. A while ago, I proofed several pages from an old Harrods catalog. So I went back, found some promising-looking original images, and pieced together an image large enough to cover the front and back of the book.
One of the reasons I have not done much bookbinding of late is that I learned to cut the cover boards using a heavy-duty guillotine-style paper cutter. It was quick, easy, and made perfectly-sized cover and spine pieces. However, although I could maybe still get into the bookbinding room on campus to use the board cutter, I thought I’d better cut the boards by hand at home. I used my big utility knife. It was neither easy nor fun, but I did get my two pieces cut. As I was making a link-stitch book, I did not need to cut a spine piece. I covered the boards with the paper I had printed, added the owl to the lower corner of the front, and placed them under my some heavy books to be pressed while they dried. (By the way, that book in the middle is my college chemistry book. There is a story behind the paper cover, but not one I will tell at this time).
In the meantime, I prepared the twelve signatures of paper by poking the sewing holes using the same template I had previously used to poke holes in the covers. It was approximately at this time that I discovered that the template I had decided to use was not quite the right size, resulting in holes too close to the edges. However, at this point I couldn’t change that, so I decided to just make the best of it.
The next morning, I pulled out some beautiful blue-green paper with gold dragonflies and carefully tore it, glued the pieces to the covers, and returned them to the textbooks to dry.
In the evening, I poked holes through the cover paper. I then cut and glued a purple paper to the insides of the cover. After this was dry, I re-poked the holes through the inside paper. The book was now ready to be sewn.
I decided to use a silver paper accordion-folded between signatures for a decorative spine. At this point, I honestly can’t remember whether this is a method one of my teachers demonstrated, or one I worked out on my own. Either way, it is an effect I like, and I have usually done it with metallic-colored papers. However, it does complicate the process somewhat, especially when one hasn’t sewn a book in several years…. Anyway, I cut a long strip of silver paper the same size as the pages. And then I discovered I did not have the right color thread. I wanted purple. The owl was telling me its book should be sewn with purple thread. It is a very demanding little owl, having already dictated all of the paper choices thus far. I had a little purple thread, but I knew it wasn’t enough. I had maroon. I had light blue. I had black. But no, it had to be purple. Fortunately, as I am once again a student, I was able to go to the art stockroom on campus (which only accepts payment by student card) and buy some purple waxed linen thread there. When I got home and settled down to sew, I realized how much I’d forgotten over the years. But finally, I remembered how to sew the first signature to the cover. After that, the rest was easier.
All the same, it took me two movies (Shrek and Gentlemen Prefer Blondes) worth of time to complete the sewing. I definitely used to be faster. There are some minor details my teachers would have taken points off for, but I am delighted with the book, anyway. And the owl label seems to be pretty happy with his new home, too.

Wednesday, September 23, 2009

What Do You Tink About That? (Part I)

A fellow seller on Etsy, TinkersShop put forth a challenge for those daring enough to accept it: use three vintage pharmacy labels, provided by her, in our own creations to be completed by October 2. I thought this sounded intriguing, and had an idea in mind, so I signed up. I received my labels and sadly neglected them for several weeks. This week, living by a very strict to-do list, I have finally carved out niches of time in which to work on the “Tink Projects”.
My first project was using the purple “Belgique” label. The elements of the label that particularly caught my eye were the scroll saying “Machelan (Brabant) Belgique” and the little circles with faces. The references to Belgium made this label a natural for my first idea—a pair of lace bobbins with the label decoupaged onto the handles. Belgium is famous for its bobbin lace, including one particular style, Bruges Flower Lace.
I started by turning a pair of cherry bobbins. The thistletop and neck were turned normally. For the handle, I wanted a smooth recess in which to place the paper. I did not do any decorative cuts, other than a little shaping of the area between the neck and the recess, as well as the end. For once, I did try to copy myself and make a matching pair. Although they are not quite identical (they never are), I surprised myself by liking the second one more! Usually when I am trying too hard to match, the copy is not as pretty. (The one on the right is the second one.)
Next, I cut the portions of the label that I wanted to use. I cut them to fit in the recess, but with excess length to roll up. I then rolled the papers on without adhesive to test the look and fit, and trimmed again as necessary. Then, I applied Mod-Podge to the back of the papers and carefully rolled them tightly on to the bobbins, also being careful not to smear the wood.
Afterward, I applied a couple of coats of the Mod-Podge to the paper (and a very small amount to the wood along the edges) to seal and provide a glossy finish. Then I carefully propped them up to dry. Yes, my drying rack is a cookie cooling rack.
The next morning I applied tung oil to the wood, this time being careful not to smudge the oil onto the paper. After the regular finishing and spangling procedure, the bobbins were ready to list for sale, submit to Tink, and just generally show off!

Wednesday, August 26, 2009

A Sharp-Witted T-Shirt

I make myself a new t-shirt every year for my birthday. I also make other shirts occasionally during the year as inspired. Before you begin the birthday greetings, let me reassure you that this blog entry is about the second type of shirt—the ones I make just because I feel like it. My first shirt, and most popular so far, was my 25th birthday shirt. I altered an image of Marilyn Monroe and added the text “Quarter of a century…makes a girl think!” (from "Some Like It Hot"). So far, I’ve mostly used the same format: picture in the middle, with text arched over and below the image. Well, I decided to do something a little different this time.

A while ago, when I was feeling somewhat artistic, I decided to do a small art panel based on a line from Much Ado About Nothing—a portion of Benedick’s epithet on Beatrice: “She speaks poignards, and every word stings.” I just used the first half of that, and illustrated it literally, using a photograph of myself that I have altered extensively, and adding in poignards (daggers) that I drew in SolidWorks and positioned in several angles. In the original art panel, I printed the words on a contrasting color of paper and decoupaged it on.
For my shirt, I used the same base image—the close-up of my face with the daggers spewing from my lips. However, on a white t-shirt, it seemed better to put a border around the image. On the art panel, the edges of the image were clearly defined, but an added border seemed advisable for the shirt. I’ve gotten into the habit of composing my t-shirt images in Word for some reason, so I just added the border there. I used a solid black border with a purple glow for the fun of it. I did toy around with adding the wording in as part of the printed image, but didn’t like how it looked. So I just printed the image as is on iron-on transfer paper, trimmed close to the border, and ironed it on, centered and just below the neckline.
Although the instructions for the transfer paper say that the paper can be peeled off while the transfer is hot for a matte finish, I have only encountered problems doing that. So I waited for it to cool, the removed the paper backing.
In order to mimic the decoupaged paper words, I pulled out some of my printer fabric. I prepared the words in Photoshop, so that I could also add in some color in the background. I printed the words first on paper to check the size against the main image, then printed the fabric. Using a hot, dry iron, I set the ink on the fabric, then cut out the word rectangles and removed the paper backing.
Next, I applied Fray Check to all edges of the rectangles. I toyed around with different ideas on how to affix the words to the shirt, but finally decided to depart from the decoupage look of the original and embrace the fabric. I used bright purple thread to completely contrast the yellowish fabric and hand-stitched the words on. I intentionally made the stitches uneven, because I like the look. And although I did not refer to my pictures of the original panel for placement of the words, I did place the “poignard” rectangle over the edge boundary, similar to how I recall positioning it in the original.
Because I love this image, I made a second art panel using it. I believe I used a different paper for the words, and although the same components are used (well, a different wood was used for the backing panel), I consider this second panel to be an original as well. It’s Number 2 in a series of similar works, I guess.
As for my shirt, I’m mostly happy with how it turned out. Because I wanted the red lips, I did use color ink when printing it. However, as I have found in the past, the color ink tends to make the blacks and grays in the image a little yellow-greenish. I usually use black ink only when printing t-shirt transfers for that reason. Also, there was a trail of wheel marks from the printer. I need to figure out a way to clean and prevent that, but they only show up when I use the transfer paper; regular paper and printer fabric are fine. As this shirt is for my own use, though, I wasn’t too bothered. By the way, if you choose to try making shirts using iron-on transfers, remember to follow the washing instructions carefully. I have messed up other shirts before by being too lazy and running them through the drier before they can handle it. It is safest to wash the shirt, then hang it to dry several times—even longer than recommended in the instructions—before attempting to dry it in the clothes drier. It will stick to itself and ruin the image if you are not careful.

Friday, June 12, 2009

Silk. Lots and lots of beautiful silk!

A few weeks ago, I found out that an enthusiastic trader on Etsy had some skeins of silk laceweight yarn she was clearing out of her abundant yarn collection. Since I like silk, I’ve been curious about working with yarn, and I was wondering just how thin laceweight yarn is, I traded a keyring pen for a skein of blue silk yarn.
Since I like to experiment on new types of thread by making longer pieces of lace, I needed to make a new pricking. After a bit of debating with myself, I decided to draw it out at a scale that would give me 8 pins per inch along the straight sides. I had thought to make scalloped edges, similar to the edges on the variegated thread bookmark I made a few months ago, but decided to simplify it with straight edges. The center of the strip is a simple honeycomb ground. The triangles along the edges are half-stitch, and along each edge two pairs of passives are worked in whole stitch to give a sturdy woven edge.

After drawing out the design, I scanned it in to my computer and printed out two copies. I carefully cut and taped the strips to align the design. Cheating a little, I did not mount the printouts on a stiff backing, and I did not pre-prick the holes. The reason I made the pattern so long is that I wanted to try working it on a roller pillow I bought on ebay a few years ago. I pinned the paper strip to the center of the roller, then wound about a yard of yarn onto each of 32 bobbins (16 pair). I started the lace at a point, similar to the bookmarks I’ve made, and worked it as normal.
For the most part, working with the laceweight yarn was no different than with thread. However, it was not an even thickness, and the thicker slubs had to be worked with carefully. They tended to get stuck in the whole stitch edges. The lace was a little looser than usual, due to the large scale at which I drew the pattern.
When working on a roller pillow, you work an inch or so at a time, then turn the roller back a bit to expose the next section to work. You take the pins from the back to use in the lace at the front as it is being made. I found that I liked this, because it left me with not as many pins to take out and the end when I’ve finished! However, there are some thing I don’t like about this roller pillow. I can’t push the pins all the way down, like I do on my cookie pillow. The slope on the roller is a little too steep, and the apron—the part where the bobbins lay—is awfully thick, making it a little awkward to position when working. As this is the only roller pillow I’ve ever used, I don’t know whether this is normal. I plan to make a new roller pillow myself, so I’ll try to eliminate at least a couple of those issues.

I started to run out of yarn on a couple of bobbins before I quite reached the end of the 17 ½” long pattern, but what I had was long enough for what I wanted, so I finished off at a point similar to the beginning. Because the lace was fairly loose, as I mentioned earlier, I laid the strip out flat and treated it with spray starch. I didn’t iron the lace, but let it air dry. That worked wonders!
It wasn’t until I was partway through making the strip of lace that I finally decided what to do with it. I often wear my hair pulled back by a sash, since it’s too short to pull back in a ponytail. Since I have quite a bit of undyed silk chiffon left over from a rather nice dress I made a couple of years ago, I decided to make a silk hair sash on which to mount the silk lace.

Originally, I’d thought to make a long, skinny sash, barely wider than the lace. But the first piece I pulled out of my bag of leftover silk was a roughly rectangular piece the full 44” width of the fabric, with the barely noticeable selvages still present. That gave me a new idea. I sewed the long edges together in a French seam and pressed it in the middle of the long strip.

Folding it in quarters, I marked the center, then marked the center of the lace and sewed it in the middle of the sash. I decided to leave the ends open so that, when tied, it would give the effect of a regular scarf. When I was taking pictures of it, I played around with folding it in long thirds the width of the lace, and laying flat like a head scarf. I even tied the folded sash around the neck of my wig head for another variation!


The next time I use this yarn, and probably for any other laceweight yarn, I’ll still use the eight pins per inch scale, since that works well with the unevenness, but I’ll add extra twists as necessary to make the lace a little tighter. Even doing that, though, I’ll probably still need to starch the lace. Which reminds me, I need to get some more starch because I finished off my current can on this!